Metasploit Unleashed
This free information security training is brought to you in a community effort to promote awareness and raise funds for underprivileged children in East Africa. Through a heart-warming effort by several security professionals, we are proud to present the most complete and in-depth open course about the Metasploit Framework.Introduction
-Abraham Lincoln

This saying has followed me for many years, and is a constant reminder to me that approaching a problem with the right set of tools is imperative for success. So what does this semi philosophical opening have to do with the Metasploit Framework? Before approaching a penetration test or an audit, I take care to “sharpen my tools” and update anything updatable in BackTrack. This includes a short chain reaction, which always starts with a prompt “svn update” of the Metasploit framework.
I consider the MSF to be one of the single most useful auditing tools freely available to security professionals today. From a wide array of commercial grade exploits and an extensive exploit development environment, all the way to network information gathering tools and web vulnerability plugins. The Metasploit Framework provides a truly impressive work environment. The MSF is far more than just a collection of exploits, it's an infrastructure that you can build upon and utilize for your custom needs. This allows you to concentrate on your unique environment, and not have to reinvent the wheel.
This course has be written in a manner to encompass not just the front end "user" aspects of the framework, but rather give you an introduction to the capabilities that Metasploit provides. We aim to give you an in depth look into the many features of the MSF, and provide you with the skill and confidence to utilize this amazing tool to its utmost capabilities.
Keep in mind that the MSF is constantly evolving and I suspect that by the time this course comes to light, there will have been many changes and additions in the project. We will attempt to keep this course up to date with all new and exciting Metasploit features as they are added.
A degree of prerequisite knowledge is expected and required of students before the content provided in this course will be useful. If you find you are unfamiliar with a certain topic, we recommend you spend time engaging in self research on the problem before attempting the module. There is nothing more satisfying than solving problems yourself, so we we highly encourage you to Try Harder.
Metasploit Architechture

Filesystem and Libraries
The MSF filesystem is laid out in an intuitive manner and is organized by directory.- lib: the 'meat' of the framework code base
- data: editable files used by Metasploit
- tools: various useful command-line utilities
- modules: the actual MSF modules
- plugins: plugins that can be loaded at run-time
- scripts: Meterpreter and other scripts
- external: source code and third-party libraries
Libraries
Rex
- The basic library for most tasks
- Handles sockets, protocols, text transformations, and others
- SSL, SMB, HTTP, XOR, Base64, Unicode
Msf::Core
- Provides the 'basic' API
- Defines the Metasploit Framework
Msf::Base
- Provides the 'friendly' API
- Provides simplified APIs for use in the Framework
Modules and Locations
Metasploit, as presented to the user, is composed of modules.Exploits
- Defined as modules that use payloads An exploit without a payload is an Auxiliary module
Payloads, Encoders, Nops
- Payloads consist of code that runs remotely Encoders ensure that payloads make it to their destination Nops keep the payload sizes consistent.
Modules Locations
Primary Module Tree
- Located under $install/modules//
User-Specified Module Tree
- Located under ~/.msf3/modules//
- This location is ideal for private module sets
Loading Additional Trees at Runtime
- Pass the -m option when running msfconsole (./msfconsole -m)
- Use the loadpath command within msfconsole
Metasploit Object Model
In the Metasploit Framework, all modules are Ruby classes.- Modules inherit from the type-specific class
- The type-specific class inherits from the Msf::Module class
- There is a shared common API between modules
- Payloads are created at runtime from various components
- Glue together stagers with stages
Mixins and Plugins
A quick diversion into Ruby.- Every Class only has one parent
- A class may include many Modules
- Modules can add new methods
- Modules can overload old methods
- Metasploit modules inherit Msf::Module and include mixins to add features.
Metasploit Mixins
Mixins are quite simply, the reason why Ruby rocks.- Mixins 'include' one class into another
- This is both different and similar to inheritance
- Mixins can override a class' methods
- Protocol-specific (ie: HTTP, SMB)
- Behavior-specific (ie: brute force)
- connect() is implemented by the TCP mixin
- connect() is then overloaded by FTP, SMB, and others.
- The Scanner mixin overloads run()
- Scanner changes run() for run_host() and run_range()
- It calls these in parallel based on the THREADS setting
- The BruteForce mixin is similar
class MyParent
     def woof
          puts “woof!”
     end
end

class MyClass < MyParent
end

object = MyClass.new
object.woof() => “woof!”

================================================================

module MyMixin
     def woof
          puts “hijacked the woof method!”
     end
end

class MyBetterClass < MyClass
     include MyMixin
end
[/CODE]
Metasploit Plugins
Plugins work directly with the API.- They manipulate the framework as a whole
- Plugins hook into the event subsystem
- They automate specific tasks which would be tedious to do manually
- Plugins can add new console commands
- They extend the overall Framework functionality
Required Materials
It should come as no surprise that the majority of exploits available in the Metasploit Framework are targeted against Microsoft Windows, so in order to complete the course labs you will require a target system to attack. This system should consist of a Virtual Machine running on your choice of host operating system.While VMware Converter and VMware Player are "free", you will have to register for the downloads. However, the virtualization applications and appliances are well worth the registration if you're not already a current member. You may also use VMware Workstation or other implementations of Virtual Infrastructure.
This course was created using the latest svn trunk version of the Metasploit Framework which, at the time of this writing is version 3.3-dev. If you are using back|track 4 as your platform, you can always update to the latest version of the trunk by issuing a 'svn up' in the '/pentest/exploits/framework3/' directory.
Hardware Prerequisites
Before we dive into the wonderful world of the Metasploit Framework we need to ensure our hardware will meet or exceed some requirements before we proceed. This will help eliminate many problems before they arise later in this document.All values listed are estimated or recommended. You can get away with less although performance will suffer.
Some of the hardware requirements that should be considered are:
- Hard Drive Space
- Available Memory
- Processors Capabilities
- Inter/Intra-net Access
Hard Drive Space
This will be the most taxing hurdle to overcome. Be creative if you might have some storage space constraints. This process can consume almost 20 gigabytes of Storage space, so be forewarned. This means we can not use a FAT32 partition since it does not support large files. Choose NTFS, ext3 or some other format. The recommended amount of space needed is 40 gigabytes.
If you decided to produce clones or snapshots as you progress through this course, these will also take up valuable space on your system. Be vigilant and do not be afraid to reclaim space as needed.
Available Memory
Without supplying enough memory to your HOST and GUEST operating systems you will eventually cause system failure. You are going to require RAM for your host OS as well as the equivalent amount of RAM that you are dedicating for each virtual machine. Use the guide below to aid you in deciding the amount of RAM needed for your situation.[CODE]
[/CODE]
Linux "HOST" Minimal Memory Requirement's

   1GB of system memory (RAM)
        Realistically 2GB or more

Per Windows "GUEST" Minimal Memory Requirement's

   At least 256 megabytes (MB) of RAM (1GB is recommended) // more never hurts!
        Realistically 1GB or more with a SWAP file of equal value

(Optional) Backtrack "GUEST" Minimal Memory Requirement's

   AT least 512 megabytes (MB) of RAM (1GB is recommended) // more never hurts!
     Realistically 1GB or more with a SWAP file of equal value
Processor
Processor Speed is always a problem with dated hardware although old hardware can be utilized in other fashions to serve a better purpose. The bare-minimum requirement for VMware Player is a 400MHz or faster processor (500MHz recommended). The more horsepower you can throw at it, of course, the better.Internet Accessibility
This can be solved with a cat5 cable from your router/switch/hub. If there is no DHCP server on your network you will have to assign static IP addresses to your GUEST VM's. A wireless network connection can work just as well as an Ethernet cable, however, the signal degradation over distance, through objects, and structures will severely limit your connectivity.Metasploitable
One of the problems you encounter when learning how to use an exploitation framework is trying to configure targets to scan and attack. Luckily, the Metasploit team is aware of this and released a vulnerable VMware virtual machine called 'Metasploitable'. This VM has a number of vulnerable services and packages installed for you to hone your skills on.The VM will run on any recent VMware product and is configured with a non-persistent disk so any potential damage you do to the system will be reverted on reboot. For more information on Metasploitable, you can read the introductory blog post at http://www.metasploit.com/express/community and download the torrent file from http://www.metasploit.com/express/community.
Once you have downloaded the VM, extract the zip file, open up the vmx file using your VMware product of choice, and power it on. After a brief time, the system will be booted and ready for action.

For more information on the VM configuration, there is a readme.txt file but beware...there are spoilers in it.
Setting up your Windows XP SP2
In order to get the most benefit from the information in this course, you will require access to an installation of Windows XP SP2 to test against. It is highly recommended that you set up a virtual machine using a product such as VirtualBox, VirtualPC, or the free VMware Server.If you don't happen to have an old WinXP CD lying around, you can try to download the Federal Desktop Core Configuration (FDCC) image from NIST. If you choose this route, you will need to remove all of the patches that are installed in the VM.
Making The XP Machine Vulnerable
- Go into the Control Panel and select "Switch to Classic View" on the left-hand side.
- Open "Windows Firewall" and turn it "Off".
- Open "Automatic Updates" and select "Turn off Automatic Updates" so Windows doesn't undo our changes for us.
- Open "Security Center", select "Change the way Security Center alerts me" on the left-hand side and de-select all of the checkboxes. This will disable the annoying system tray pop-up notifications.
- Back in the Control Panel, open "Add or Remove Programs". Select the "Show updates" checkbox at the top. This will display all of the software and security updates that have been installed.
- Still in the Control Panel, from the toolbar, select "Tools", then "Folder Options". Select the "View" tab and scroll all the way to the bottom. Make sure you un-check the box next to "Use simple file sharing" and click "OK".
Setting Up Additional Services
In order to provide a larger attack surface for the various components of Metasploit, we will enable and install some additional services within our Windows virtual machine. Bear in mind that you will require the Windows XP installation CD or iso in order to install additional services in the VM.Internet Information Services (IIS) and Simple Network Management Protocol (SNMP)
To begin, navigate to the Control Panel and open "Add or Remove Programs". Select "Add/Remove Windows Components" on the left-hand side.
Select the "Internet Information Services (IIS)" checkbox and click "Details". Select the "File Transfer Protocol (FTP) Service" checkbox and click "OK". By default, the installed IIS FTP service allows for anonymous connections.

Lastly, select the "Management and Monitoring Tools" checkbox and click "Details". Ensure that both options are selected and click "OK". When all is ready, click "Next" to proceed with the installation of IIS and SNMP.

There is an issue with the .NET Framework installed in the NIST virtual machine but it is easily fixed. In the Control Panel, select "Add or Remove Programs" again, select "Microsoft .NET Framework 2.0 Service Pack 1", and click "Change".

A progress window will pop up and a progress bar will be displayed and then it will close. This is normal behavior and you can now exit the Control Panel and proceed.

SQL Server 2005 Express
We will also perform an installation of Microsoft's free SQL Server 2005 Express. This will allow us to use some of the different SQL modules in Metasploit. First, download the non-service pack version of SQL Server ExpressNote that if you are using your own custom-built VM for this course, you will need to install the Windows Installer 3.1 and the .Net Framework 2.0 in order to install SQL Express.
Windows Installer 3.1
.NET Framework 2.0
Once the installer has finished downloading, we can run it and select all of the defaults except for "Authentication Mode". Select "Mixed Mode", set an "sa" password of "password1", and then continue on with the rest of the installation.

Once the installation is complete, we will need to make it accessible on our network. Click "Start" -> "All Programs" -> "Microsoft SQL Server 2005" -> "Configuration Tools" -> "SQL Server Configuration Manager". When the Configuration Manager starts up, select "SQL Server 2005 Services", right-click "SQL Server (SQL EXPRESS)" and select "Stop". Next, expand "SQL Server 2005 Network Configuration" and select "Protocols for SQLEXPRESS".

Double-click "TCP/IP", change "Enabled" to "Yes", and change "Listen All" to "No" on the "Protocol" tab.

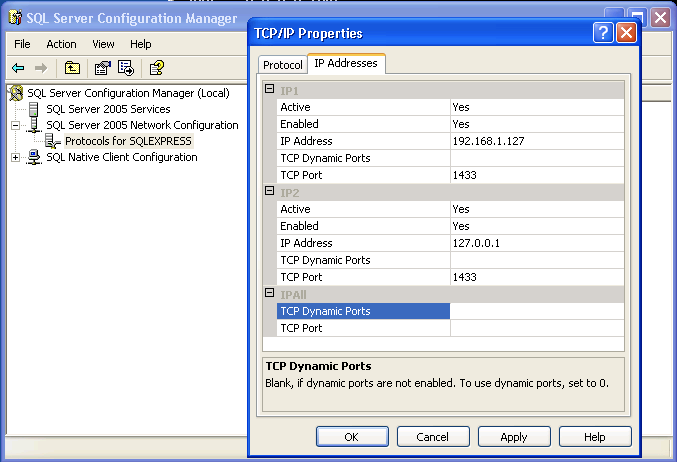
Next, select the "IP Addresses" tab, and remove any entries under "IPAll". Under "IP1" and "IP2", remove any values for "Dynamic Ports". Both IP1 and IP2 should have "Active" and "Enabled" set to "Yes". Lastly, set the IP1 "IP Address" to your local address and set the IP2 address to 127.0.0.1. Your settings should look similar to the screenshot below. Click "OK" when everything is set correctly.
Next, we'll enable the SQL Server Browser service. Select "SQL Server 2005 Services" and double-click "SQL Server Browser". On the "Service" tab, set the "Start Mode" to "Automatic" and click "OK".

By default, the SQL server runs under a limited-privilege account which breaks a lot of custom web applications. We will change this by double-clicking "SQL Server (SQLEXPRESS)" and setting it to Log On as the Built-in Account "Local System". This can also be set by running "services.msc". Click "OK" when you've finished.

With everything finally configured, right-click "SQL Server (SQL EXPRESS)" and select "Start". Do the same for the "SQL Server Browser" service. You can now exit the Configuration Manager and verify that the services are listening properly by running "netstat -ano" from a command prompt. You should see UDP port 1434 listening as well as your network IP address listening on port 1433.

Creating A Vulnerable Webapp
In order to create our vulnerable web app, you will need to download Server Management Studio Express.Install SQL Server Managment Studio Express, accepting all of the defaults for the installation then run it via "Start" -> "All Programs" -> "Microsoft SQL Server 2005" -> "SQL Server Management Studio Express".
When Management Studio starts up, select "SQL Server Authentication" and connect using the username "sa" and password of "password1".
Right-click "Databases" in the "Object Explorer" and select "New Database".

Enter "WebApp" for the database name and click "OK". In the "Object Explorer", expand "Databases", and expand the "WebApp" database. Right-click "Tables" and select "New Table".

Create a new table named "users" with the column names and types as shown below.

Save the "users" table, right-click it and select "Open Table".

Enter in some sample data into the table and save all of your work.

Under the main "Object Explorer" tree, expand "Security", then "Logins". Right-click "Logins" and select "New Login".

In the "Login - New" window, select "Search", enter "aspnet" and click "Check Names". Click "OK" but keep the "Login - New" window open.

Click on properties for ASPNET, and ensure that under user mapping the user account has db_owner and public rights to the WebApp database.

Next, we need to create our website to interact with the back-end database we created. Start Notepad and paste the following code into a new document. Save this file as "C:\Inetpub\wwwroot\Default.aspx".
[CODE]
[/CODE]Default.aspx
Create another document containing the following code and save it as "C:\Inetpub\wwwroot\Default.aspx.cs".
[CODE]
Default.aspx.cs
[/CODE]
Lastly, create a file containing the following and save it as "C:\Inetpub\wwwroot\Web.config".
[CODE]
Web.config[/CODE]
Open up Internet Explorer an enter "http://


0 comments:
Post a Comment